

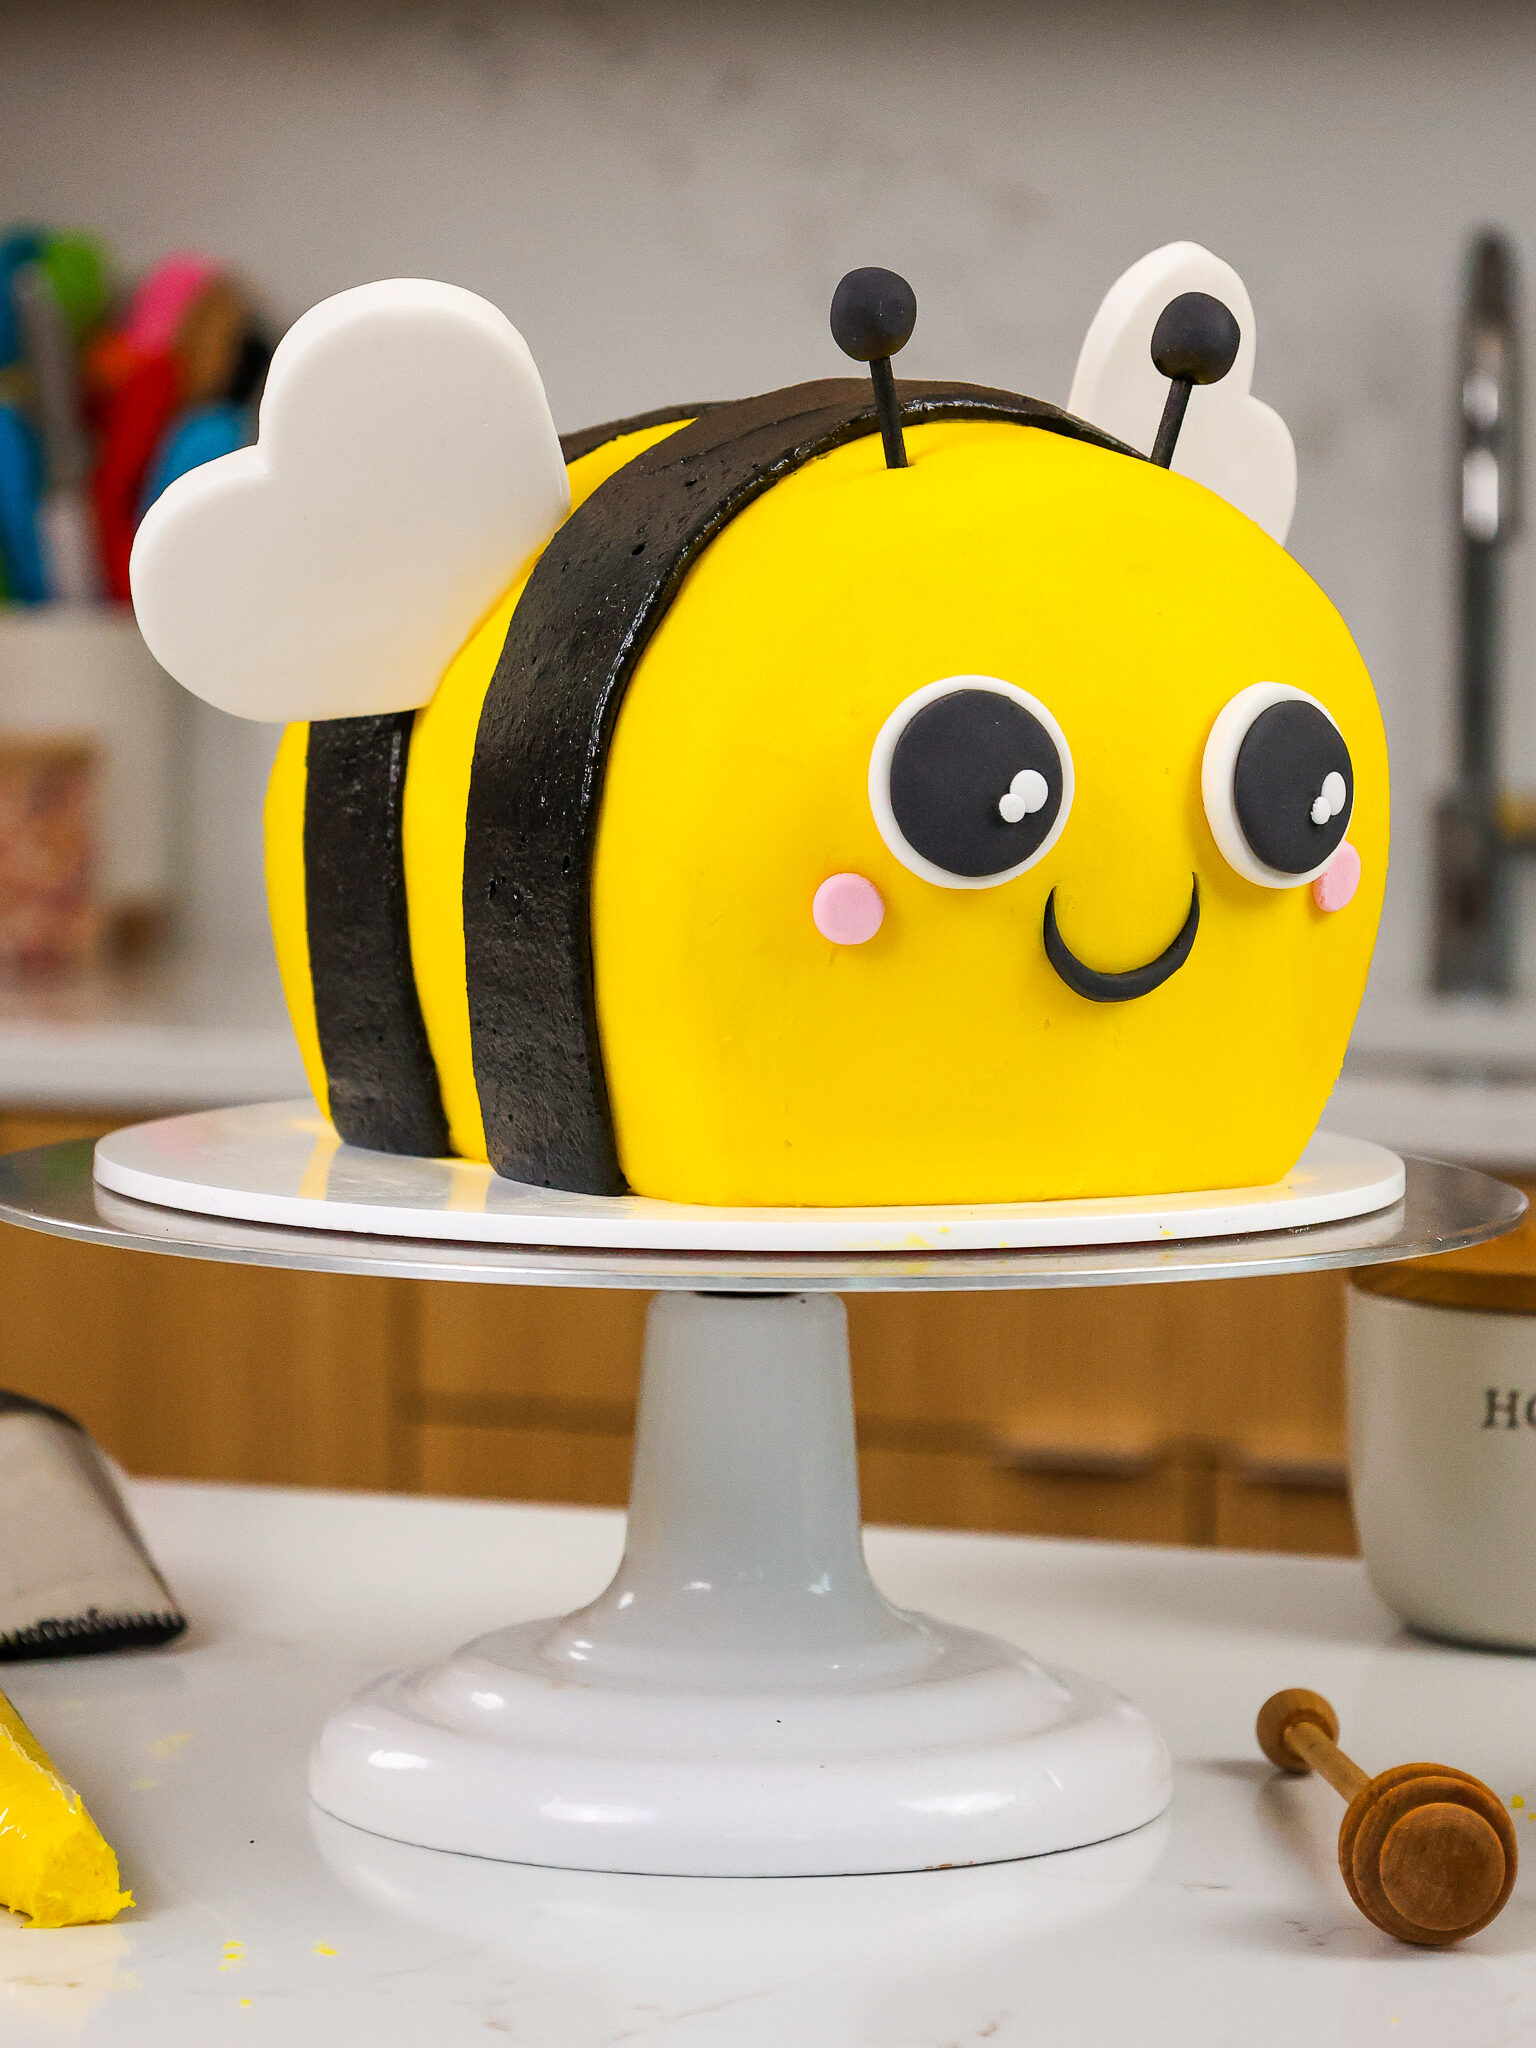
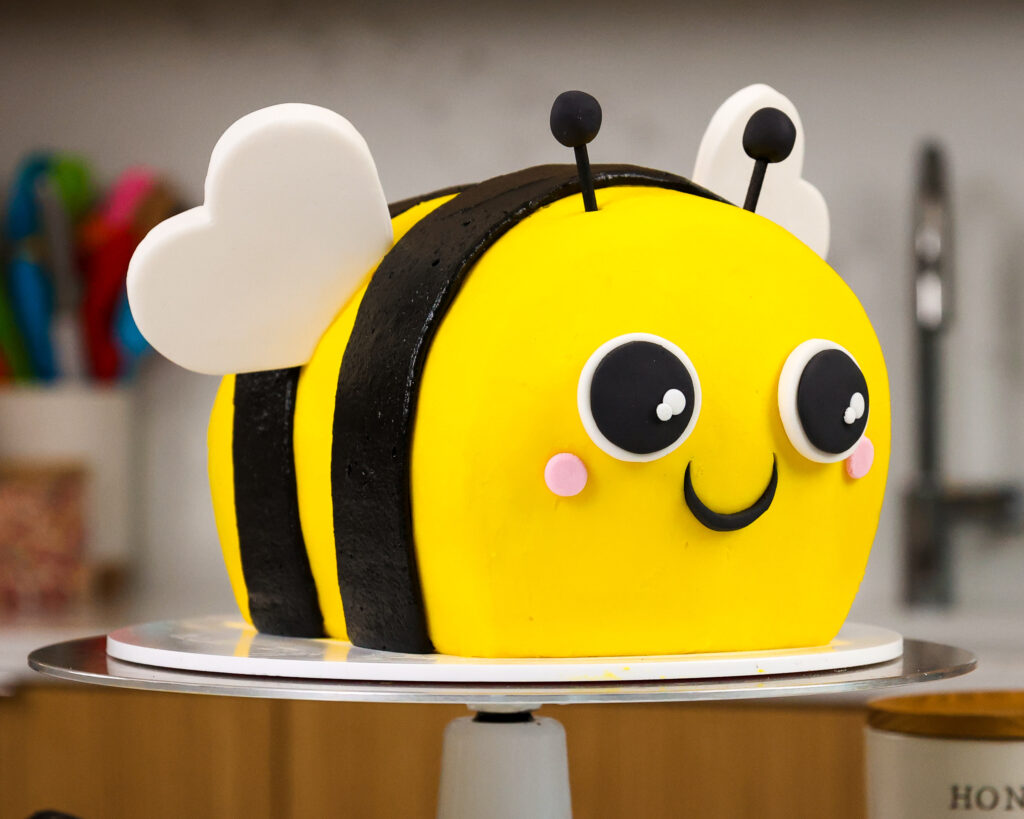
How To Make A Bee Cake
This week I revisited 1 of my older but still adorable animal cakes, my bumblebee cake! I originally fabricated this cake back in 2017 (check out the original photos at the very lesser of this postal service) and decided information technology was time for a little update.
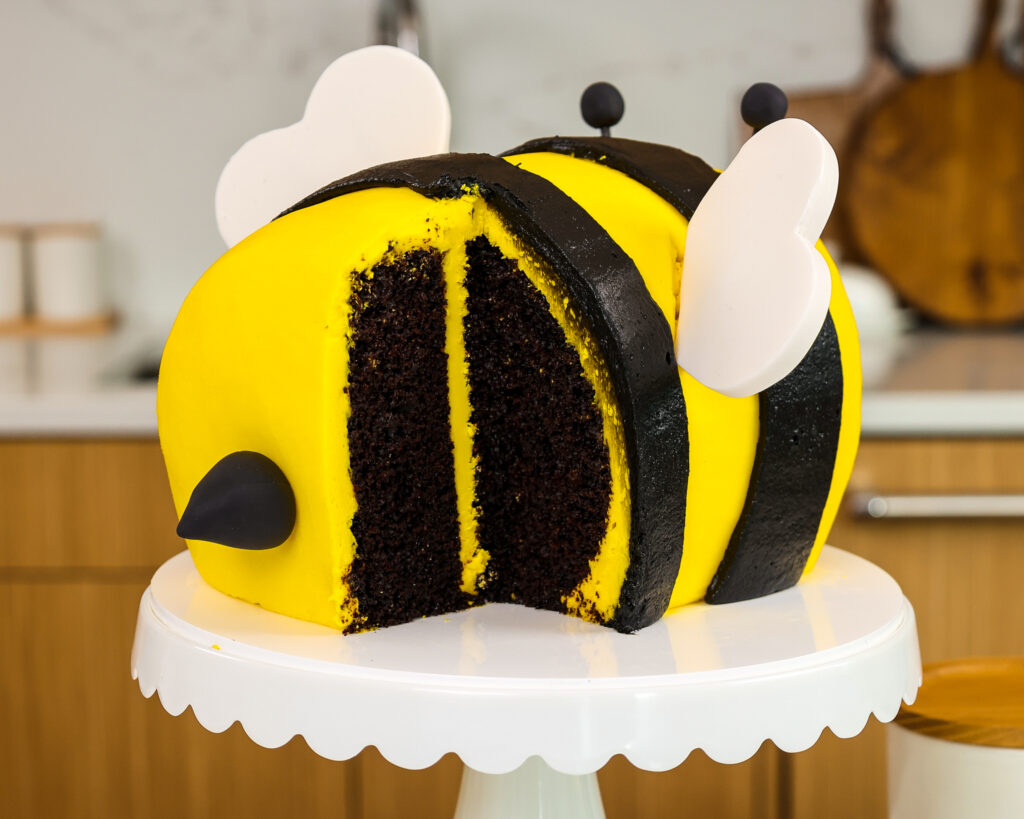
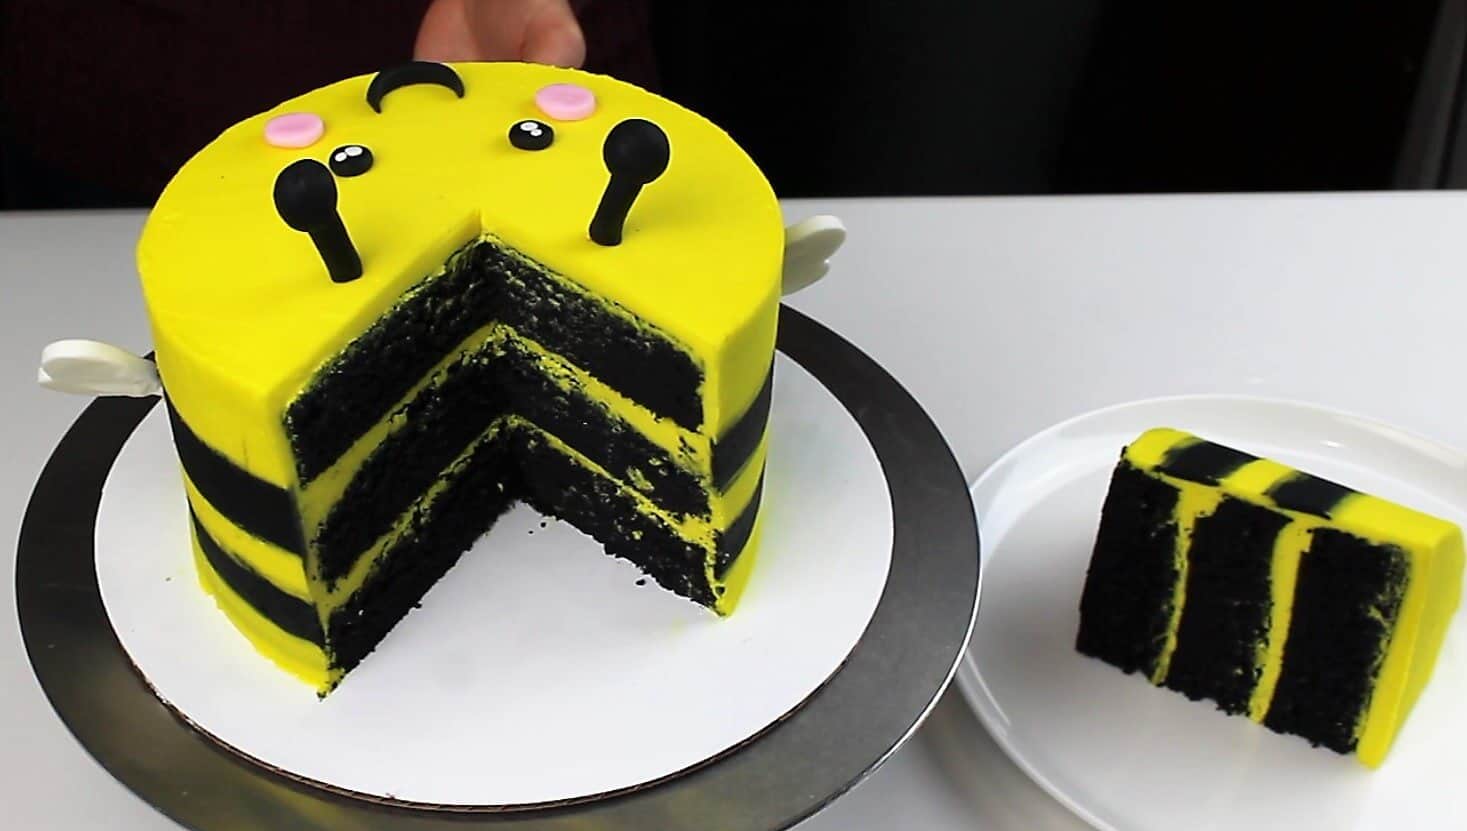
This cake is made with moist black cocoa cake layers, honey buttercream frosting, and an adorable footling fondant face.
Making this Bumblebee Cake: Footstep-past-Step Tutorial
Let's walk through each step of this cake together to make sure it turns out as astonishing as possible!
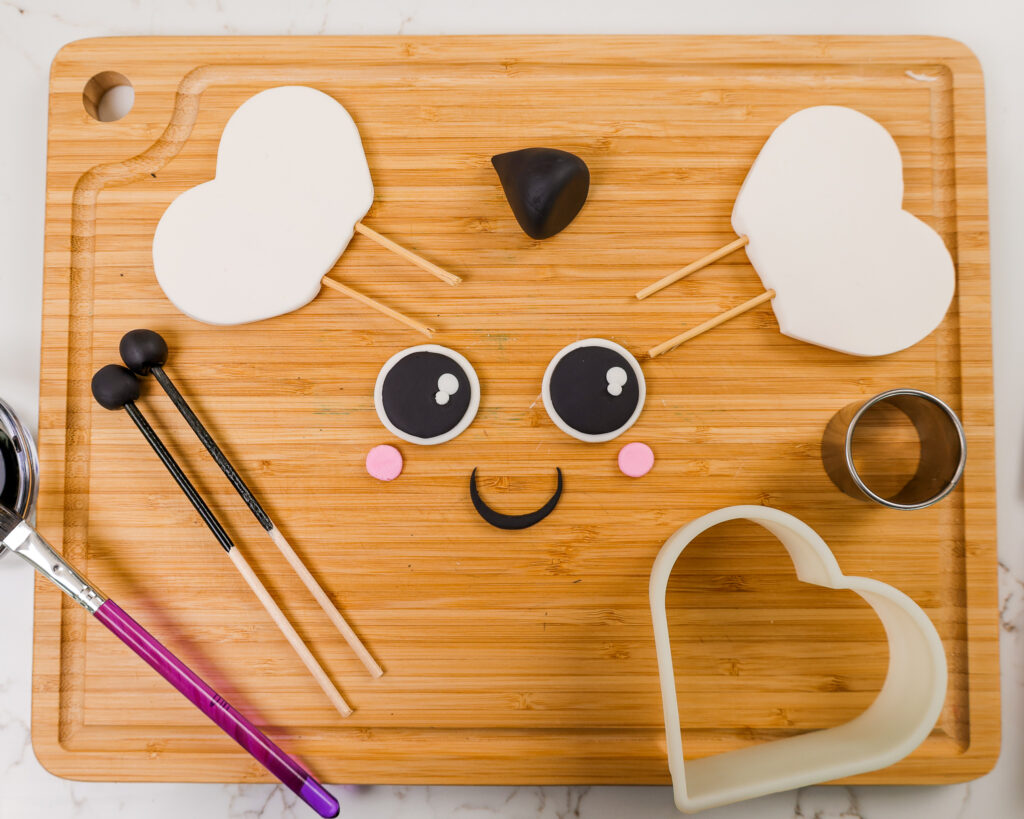
Pace i: Make the Bumblebee's Face and Wings
Make the bumblebee's wings and face commencement, so that they have time to dry! These tin be fabricated several says in advance if needed and stored uncovered at room temperature.
My secret to making the wings is using a large heart cutter (about four inches in bore). It makes it so easy to cut out symmetrical, adorable wings. Just make sure that y'all carefully flip the wings over equally they dry, then that both sides have a chance to house up.
I also recommend using small circumvolve cutters to become the shape of the optics just right.
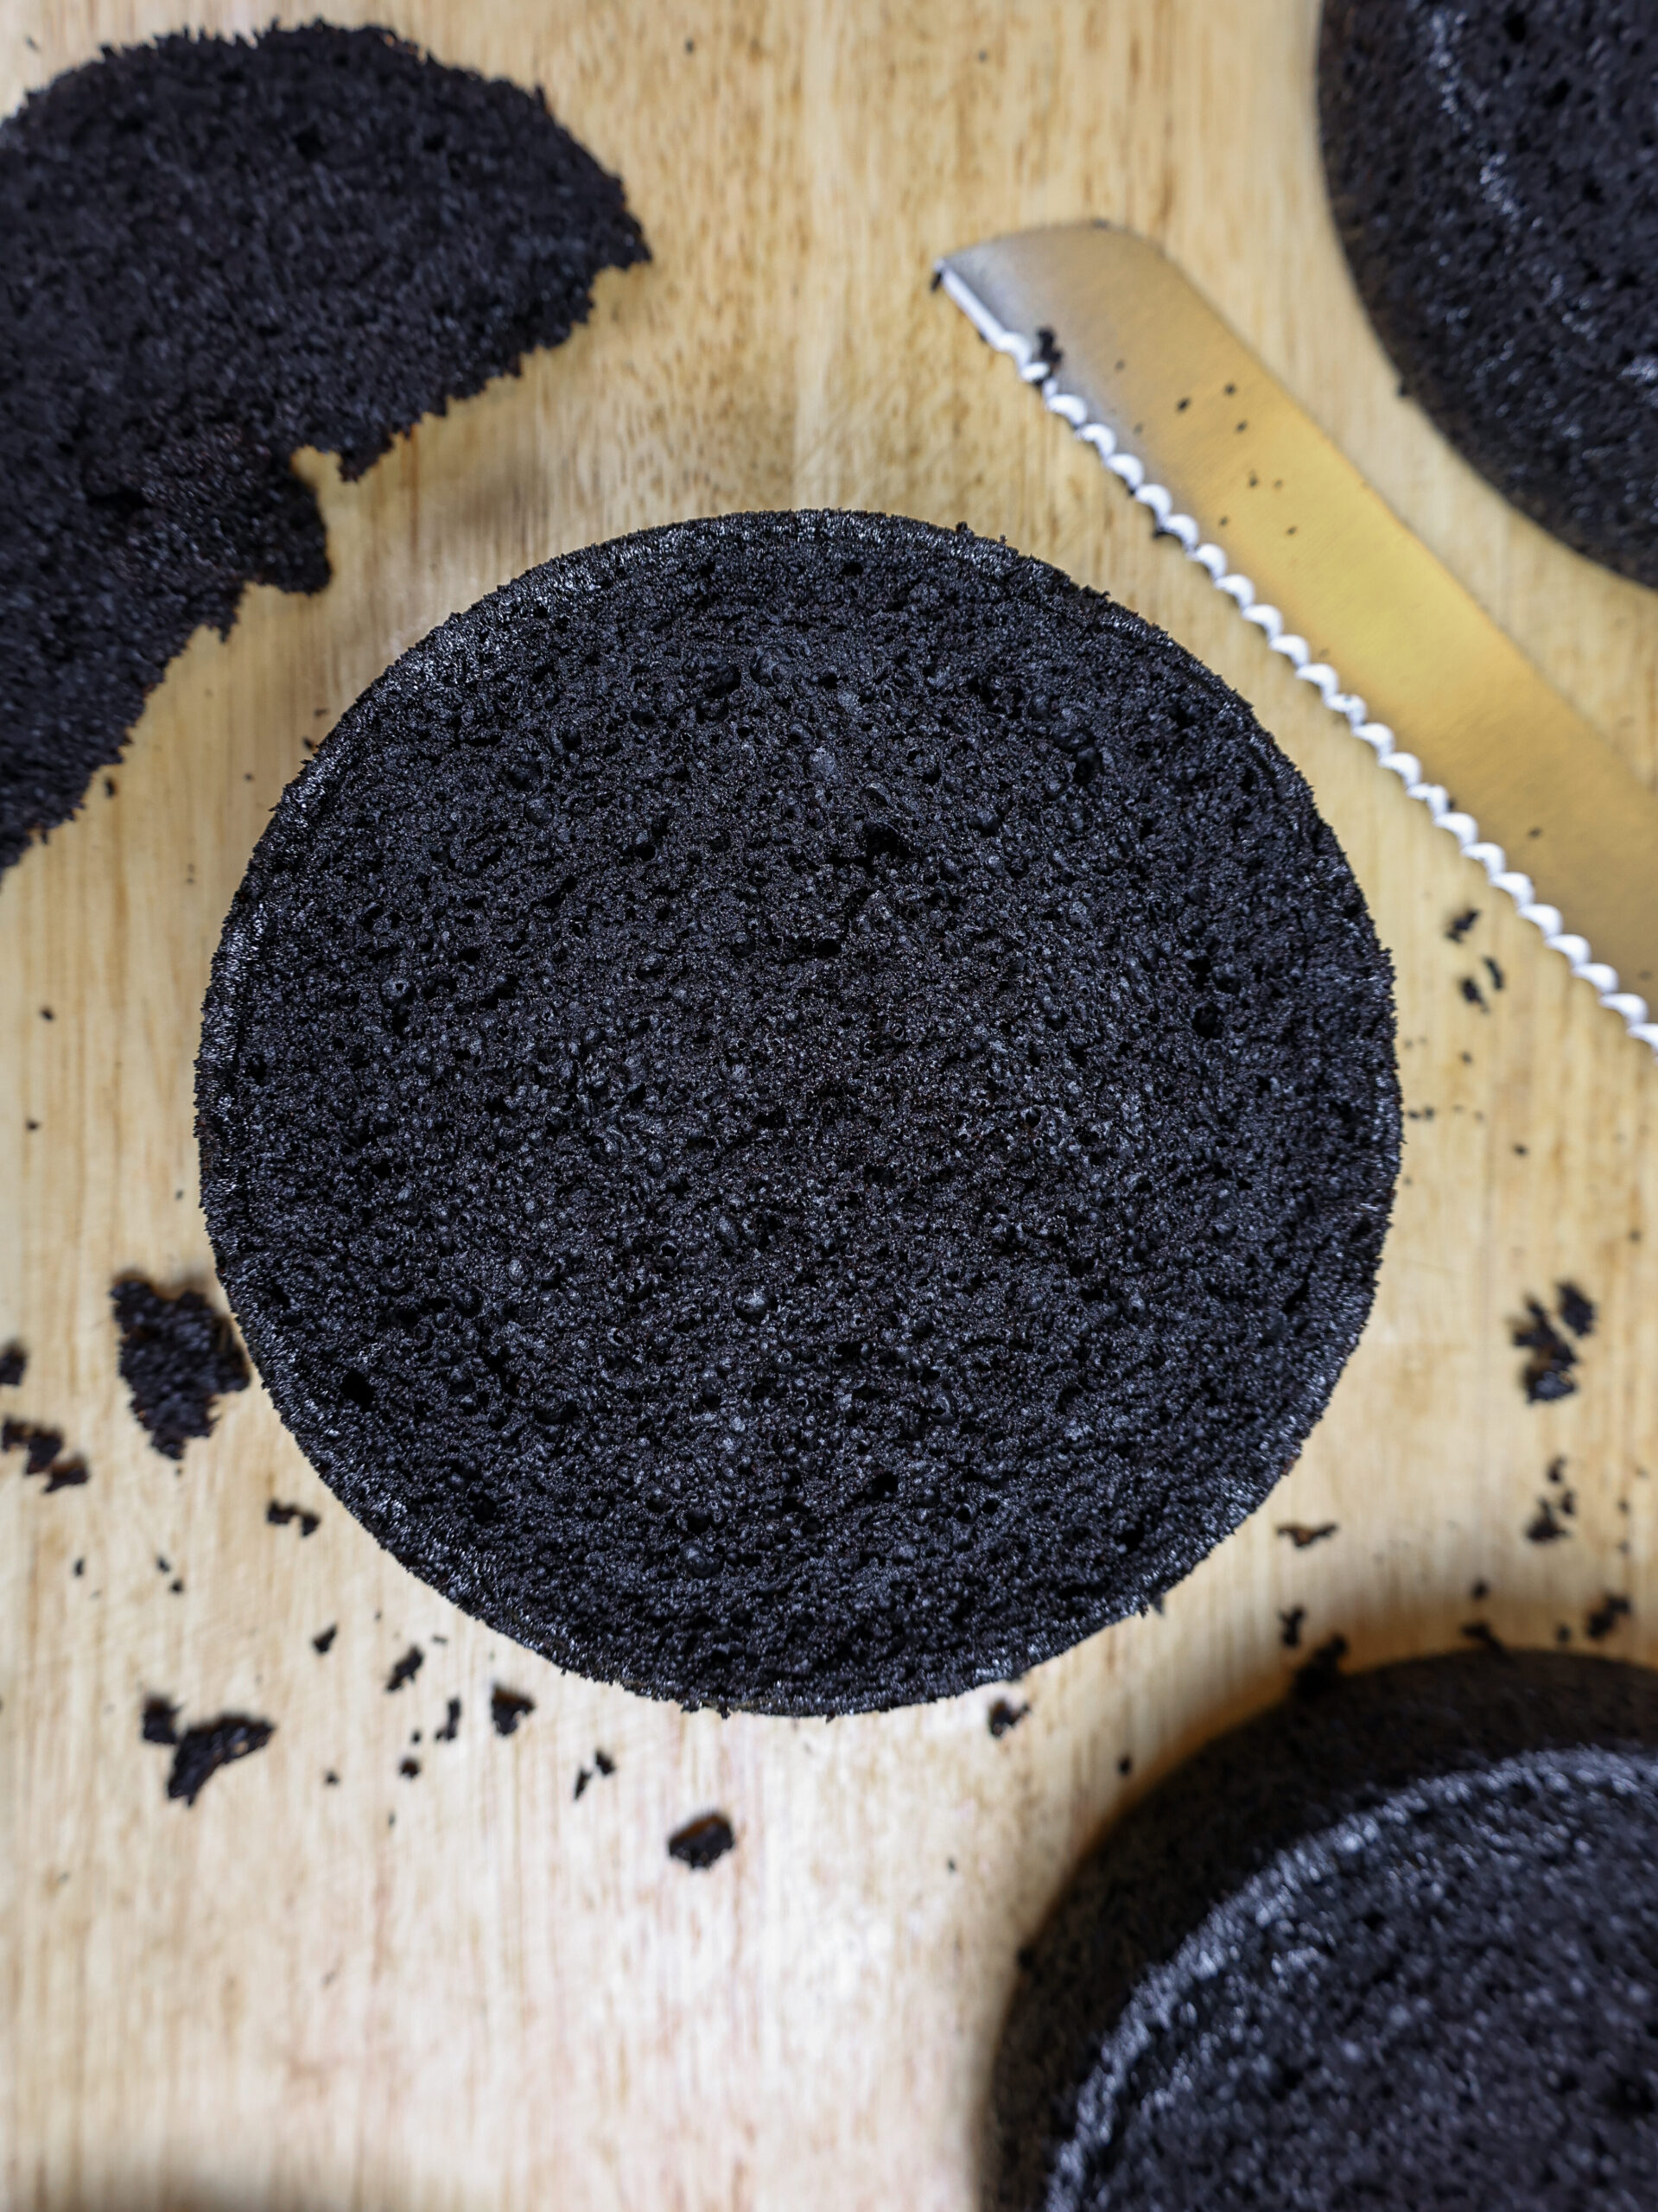
Step 2: Bake and Level Your Cake Layers
Then we gear up to work on our cake layers. Line 4 6-inch round cake pans with parchment rounds and grease with non-stick baking spray or homemade cake release.
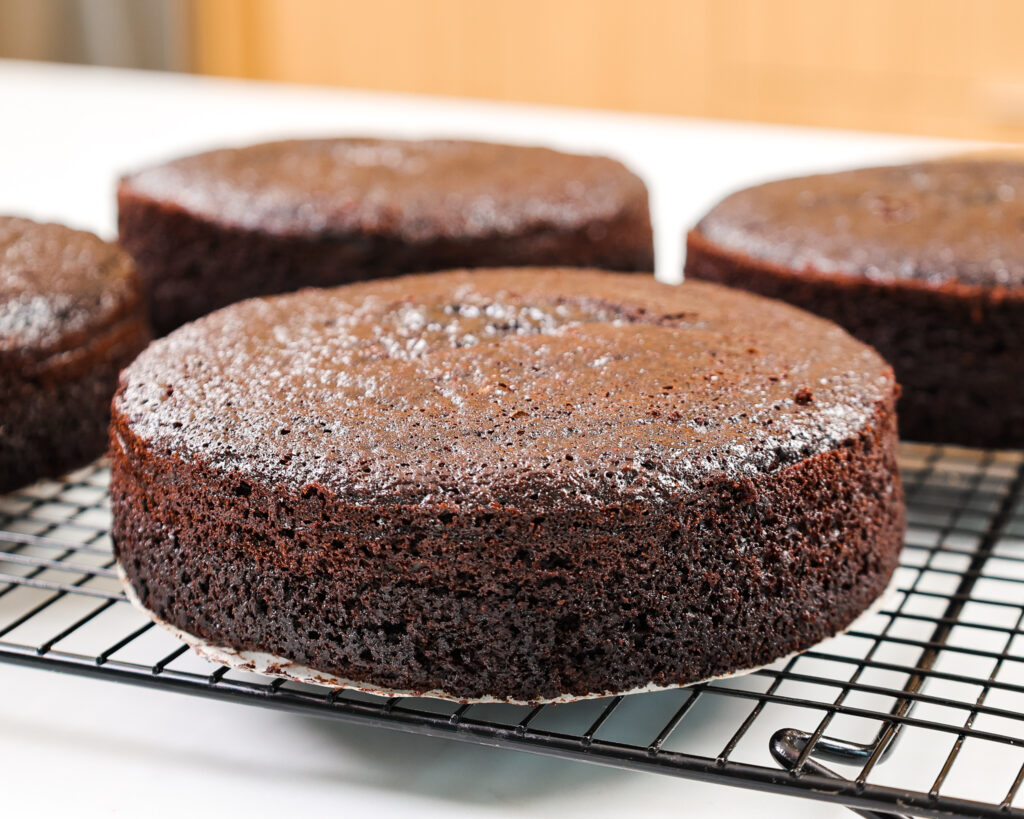
Make full with the black cocoa block batter and broil for 31-34 minutes or until a skewer comes out with a few moist crumbs.
Let the layers absurd for 10 minutes, then run an offset spatula around the perimeter of the pan to separate the cake from the pan. Flip the block layers onto a wire rack to terminate cooling.
Level two of the cake layers with a serrated knife once they're fully cooled.
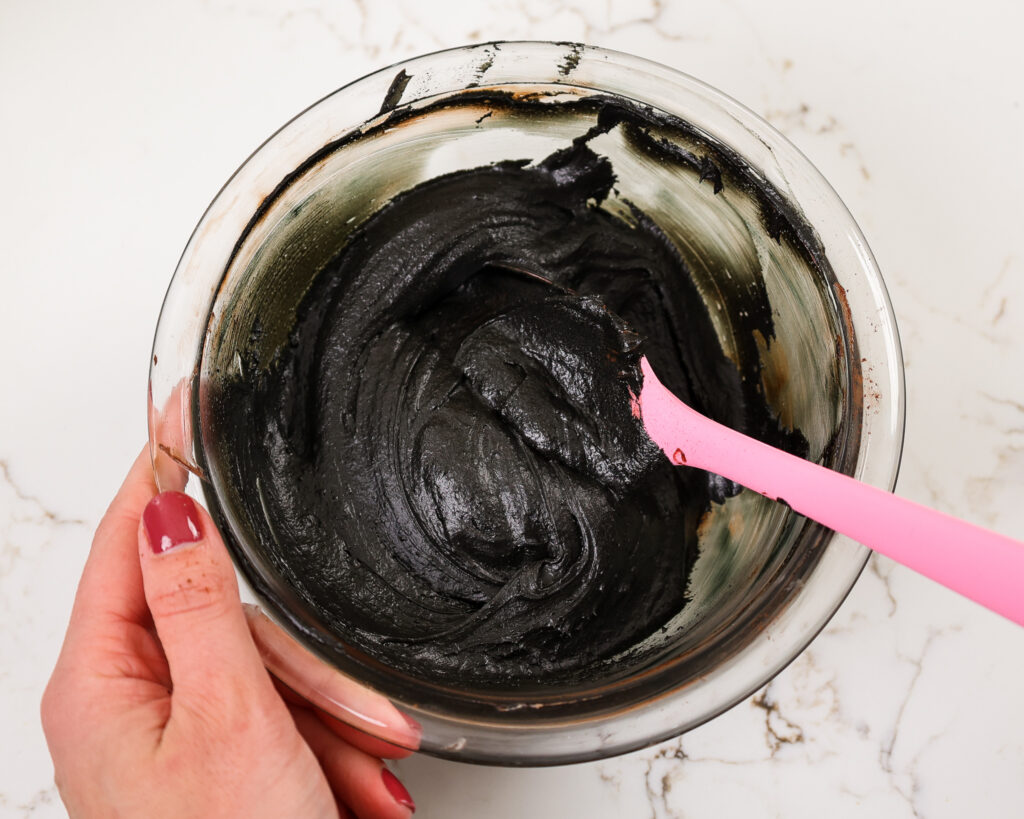
Stride #3: Make the Honey Buttercream Frosting
While the cake layers bake and cool, make the dear buttercream frosting. You can utilise either an electrical hand mixer or a stand mixer to make this frosting.
Some of you might think that chocolate block layers and beloved buttercream are an odd combo, but if that's you then you conspicuously haven't tried it before!!
Honey and chocolate are a match made in heaven. You have to trust me on this one.
If your frosting seems too thick after mixing all your ingredients, add together some heavy cream or milk (one tablespoon at a time). Or if the frosting is besides thin, add together in more than powdered saccharide (1/4 cup at a fourth dimension).
If you're unsure how thick your frosting should exist, you tin can learn what consistency yous're looking for in my frosting consistency post.
Identify i cup of buttercream in a separate bowl and mix in the nighttime or black cocoa and black gel nutrient coloring.
I recommend also calculation in 1-2 additional Tablespoons of heavy cream to the black buttercream to brand the frosting easier to pipe.
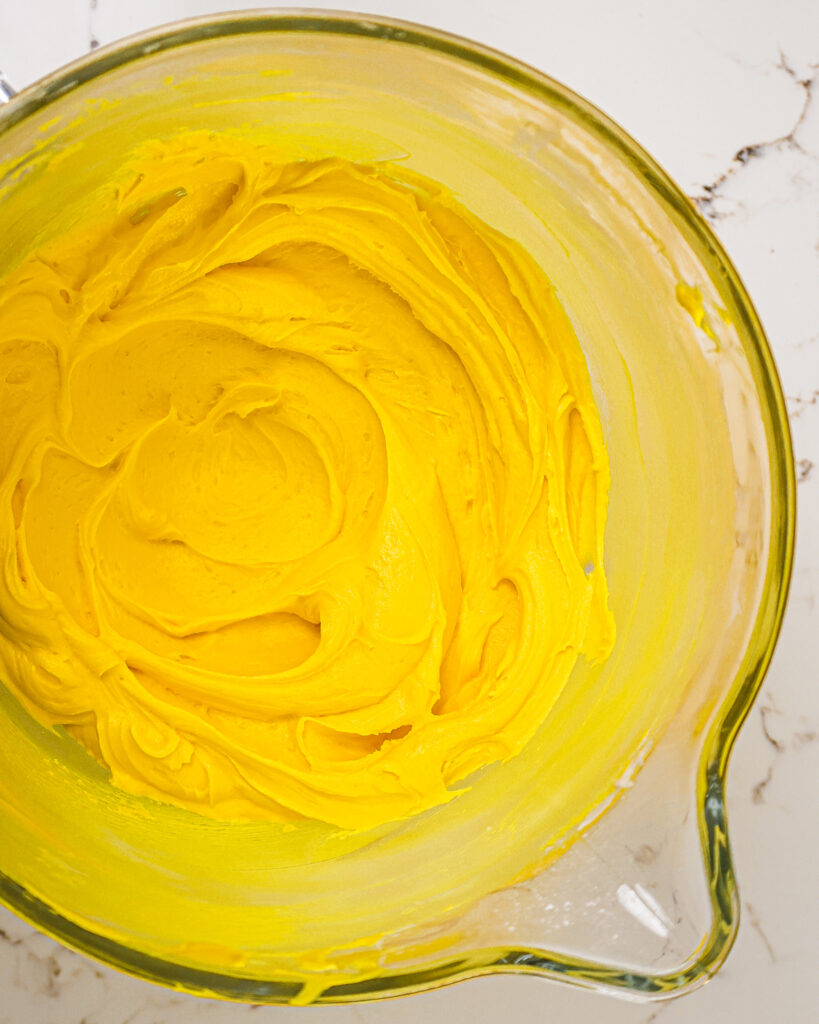
Color the remaining frosting yellowish with gel nutrient coloring and add a small drop of orange gel food coloring to give your frosting a warm, gilt tone.
Cover the frosting with plastic wrap to prevent crusting and set aside.
Step 4: Assemble and Frost the Block Layers
Next, it's fourth dimension to assemble the cake! I recommend freezing your cake layers for almost 20 minutes earlier stacking them. It volition make them way easier to handle and frost.
Stack and frost the block layers on a 10-inch greaseproof cake board. I recommend using a dab of frosting to help stick the bottom cake layer to the board. Make the unleveled cake layers to be the bottom and top layers of the block. This will give the bee a rounder shape.
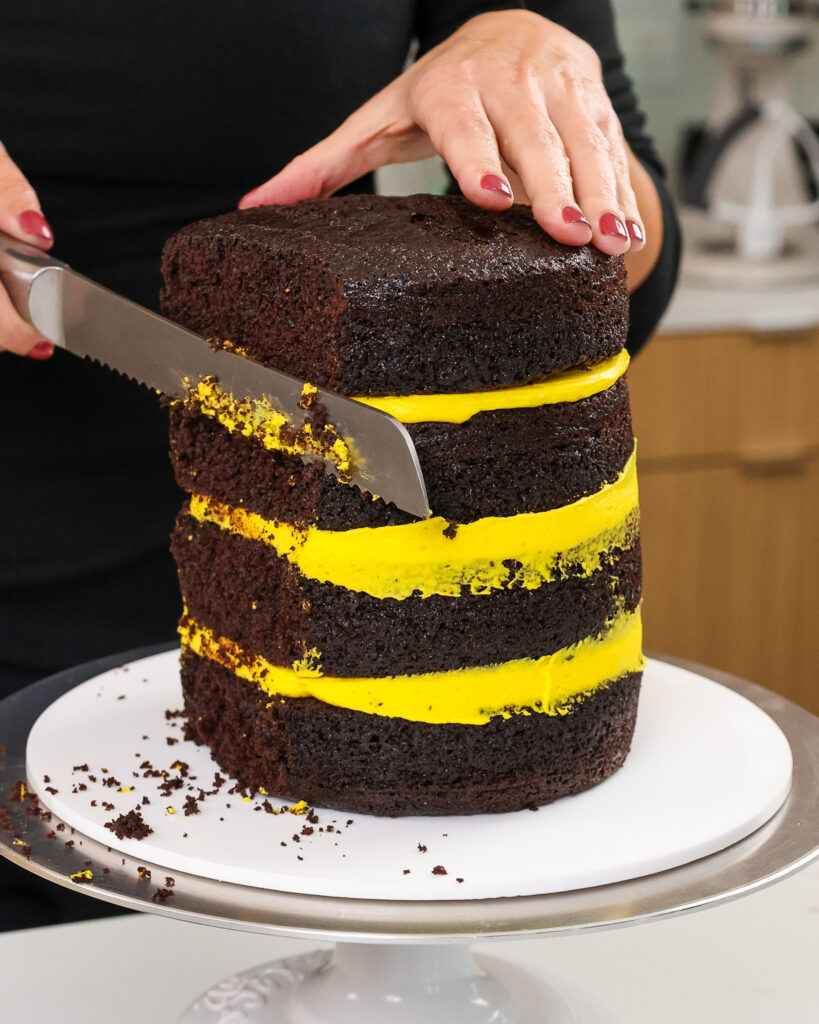
Spread a thick layer of yellowish buttercream on top of the cake layer with a large get-go spatula. Repeat with remaining cake layers.
Chill the cake in the fridge (30 minutes) or freezer (10 minutes) until the frosting is firm to the touch.
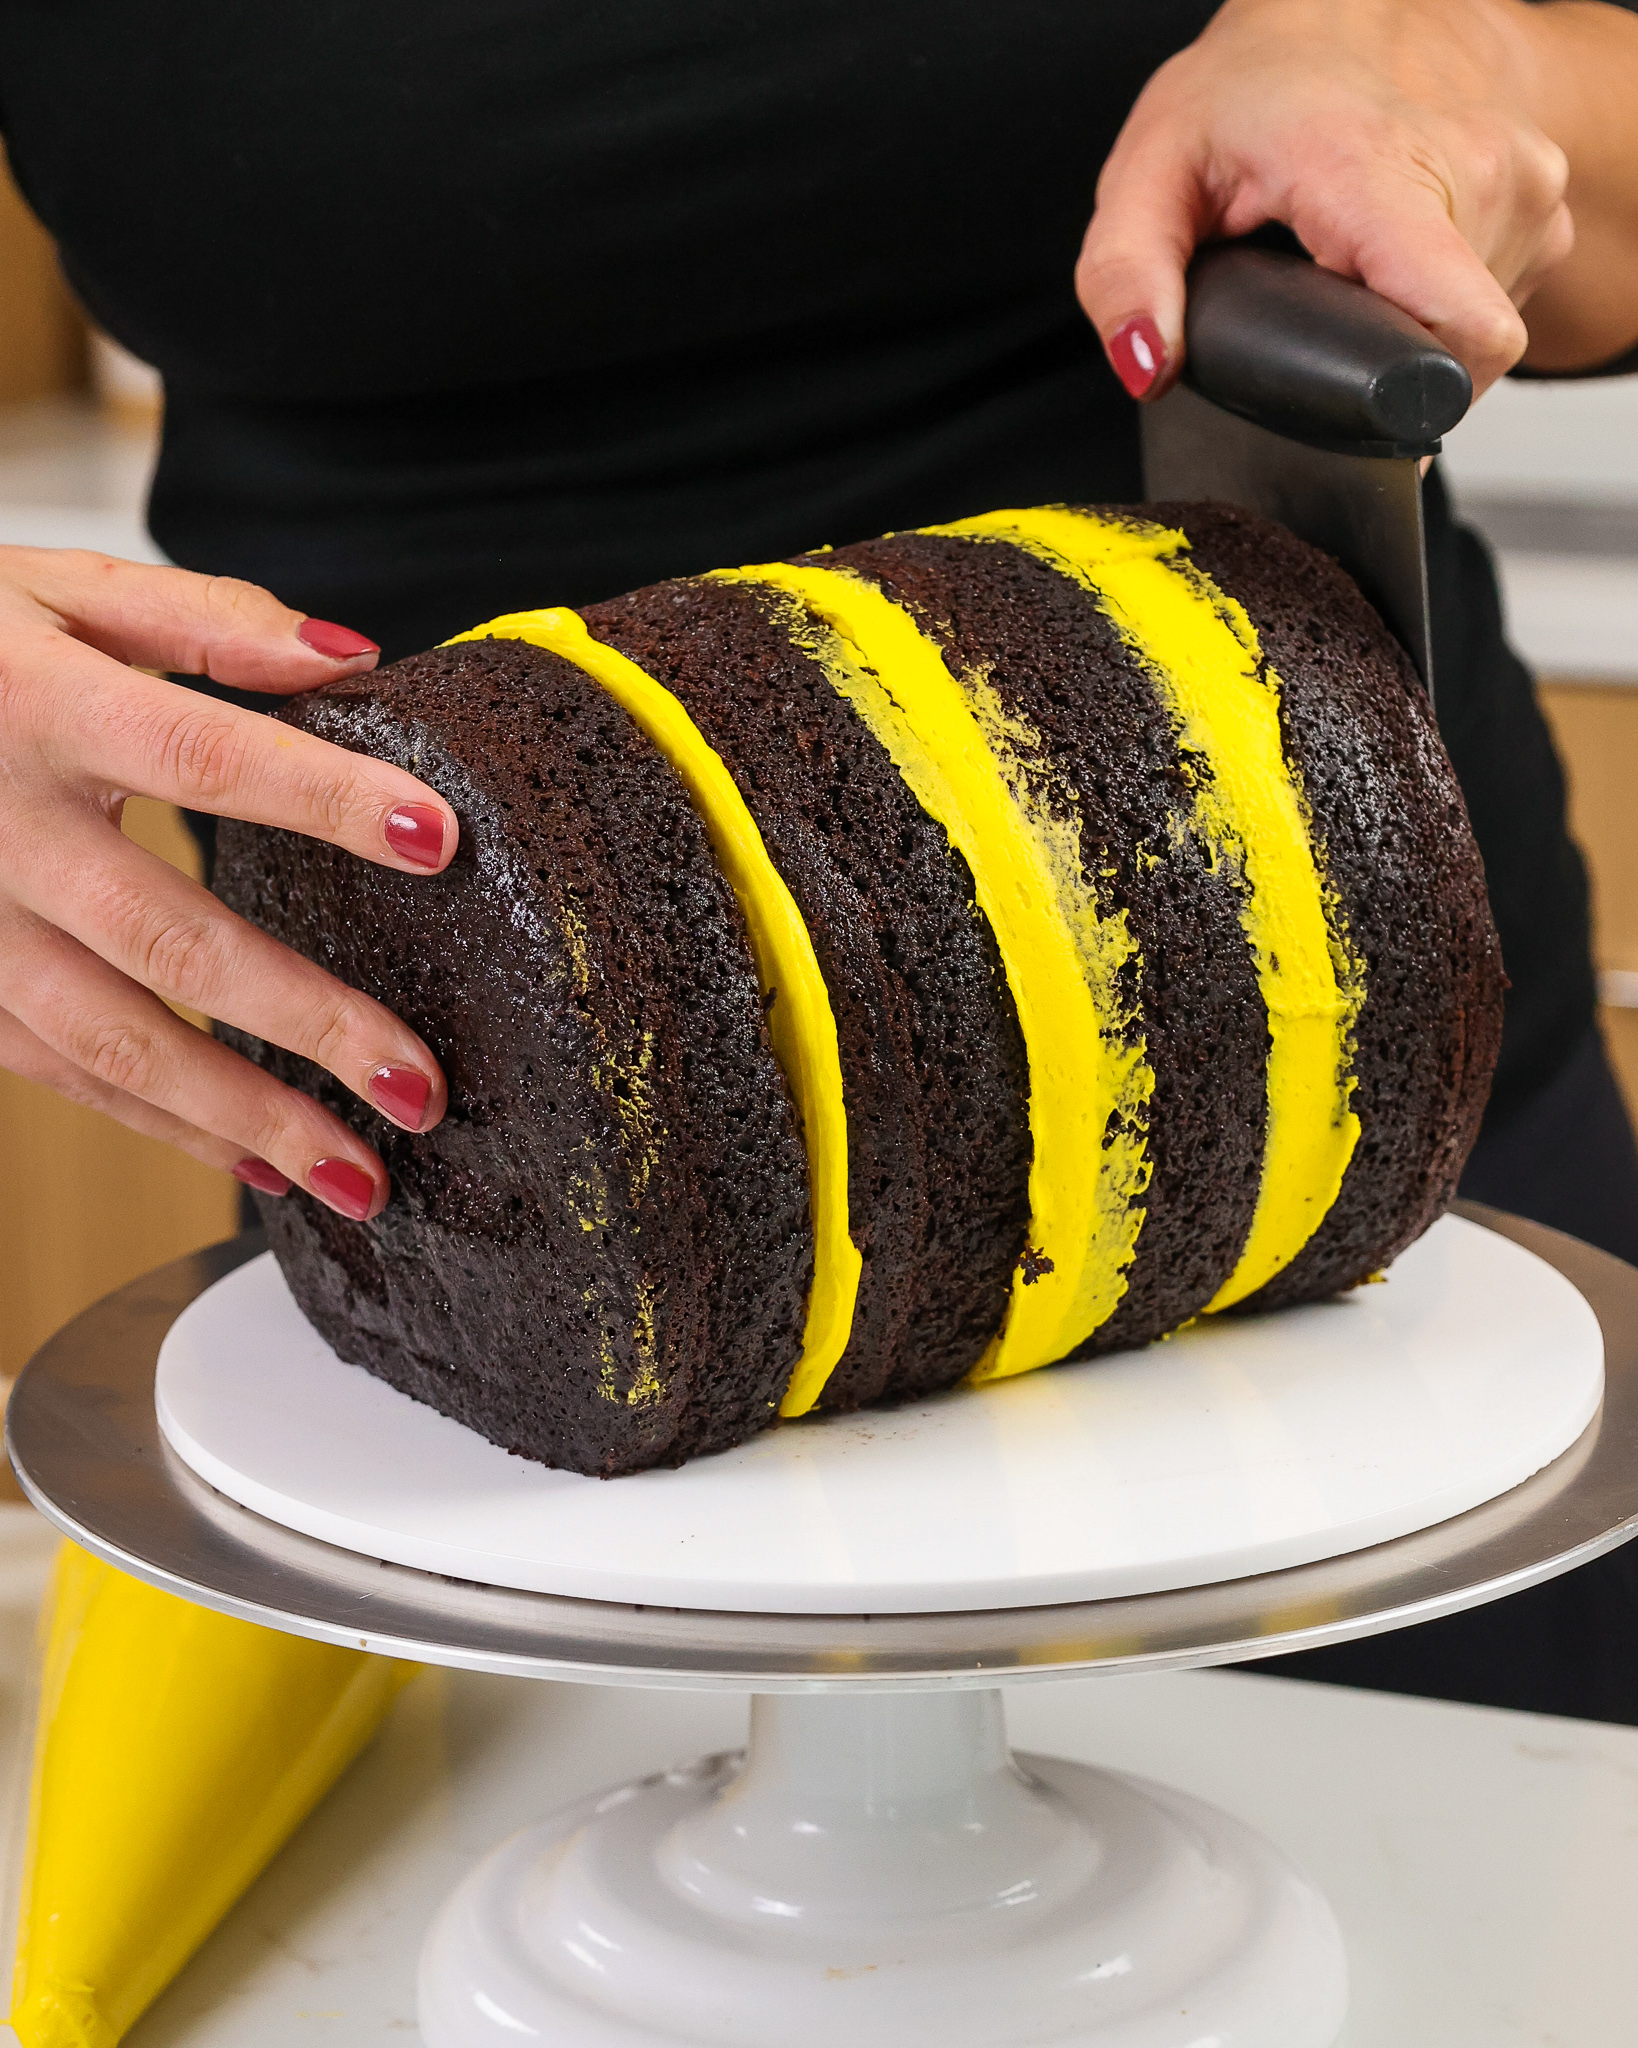
Once the frosting has set, use a precipitous knife to trim off 1-inch of cake from one side of the cake.
So carefully flip the block on its side and place the cutting portion of the cake against the cake board. I like to use a bench scraper to life the cake off the board and flip information technology.
If your cake layers start to divide from each other once the cake is flipped, insert a harbinger, chopstick, or dowel through the block the help proceed them together until the crumb glaze has ready.
Cover the cake in a thin layer of yellowish buttercream and chill again.
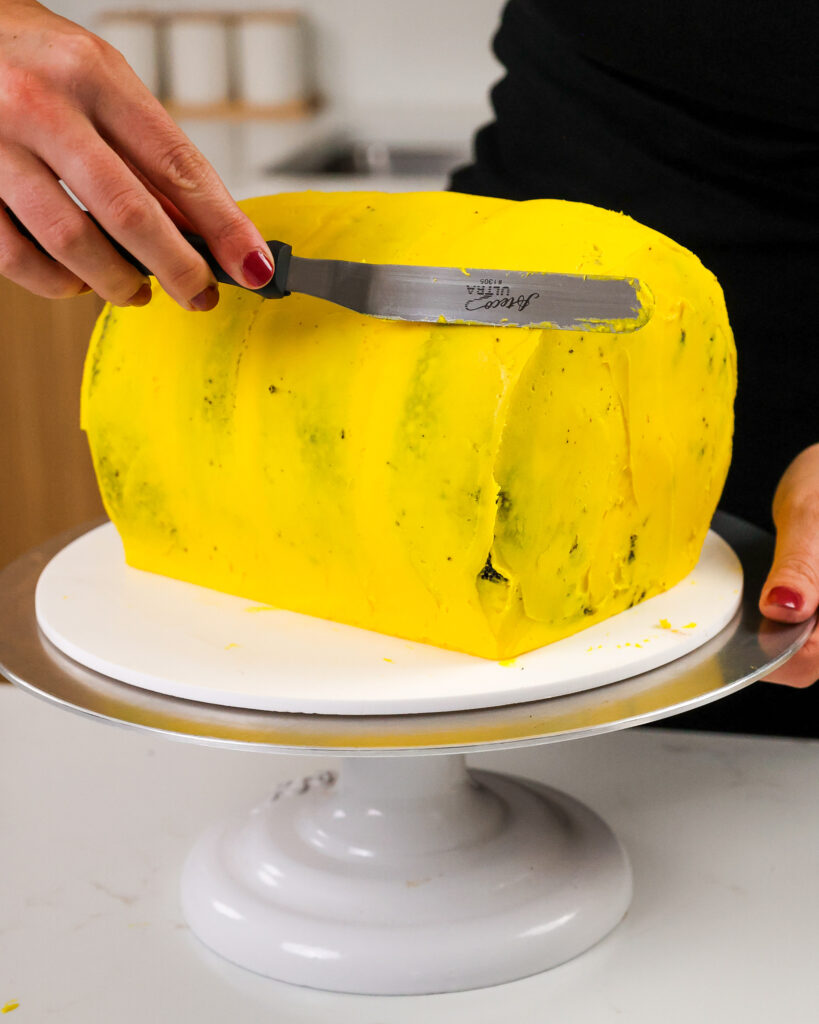
Then spread a thicker layer of yellow buttercream on the cake and smooth using a big first spatula and acetate sail.
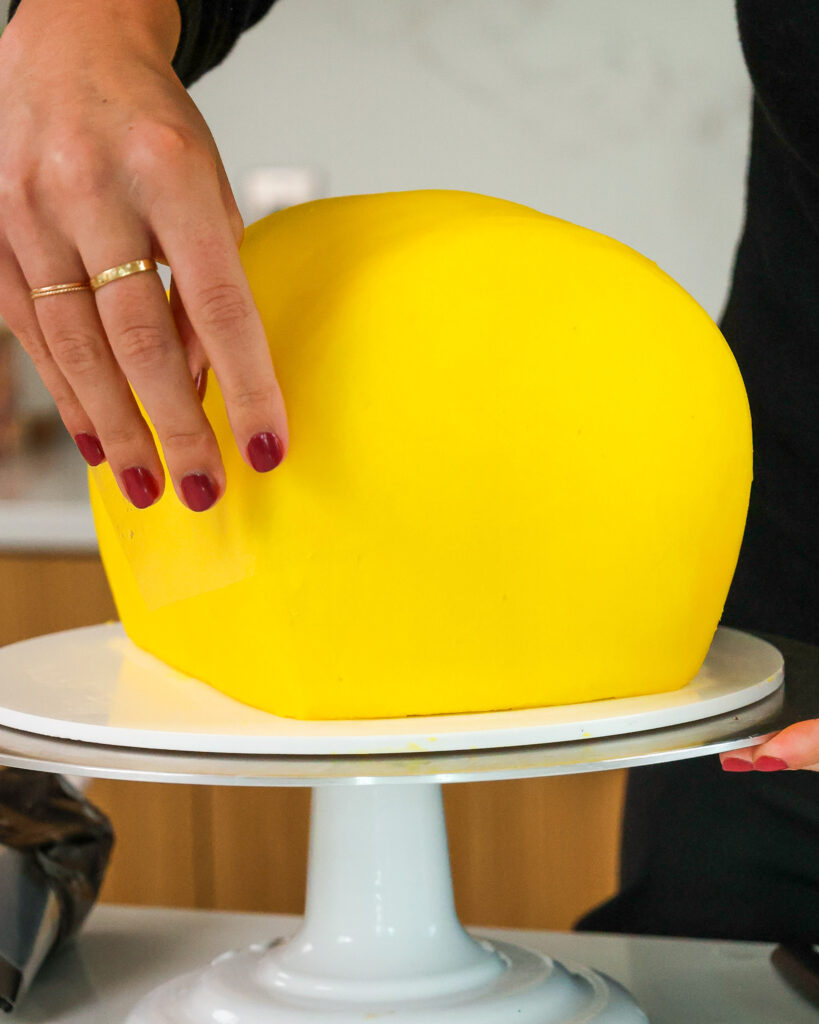
Chill the cake again in the fridge (30 minutes) or freezer (10 minutes) until the frosting is firm to the touch. This will make information technology much easier to add on the fondant facial features and wings.
Stride v: Add together the Finishing Touches
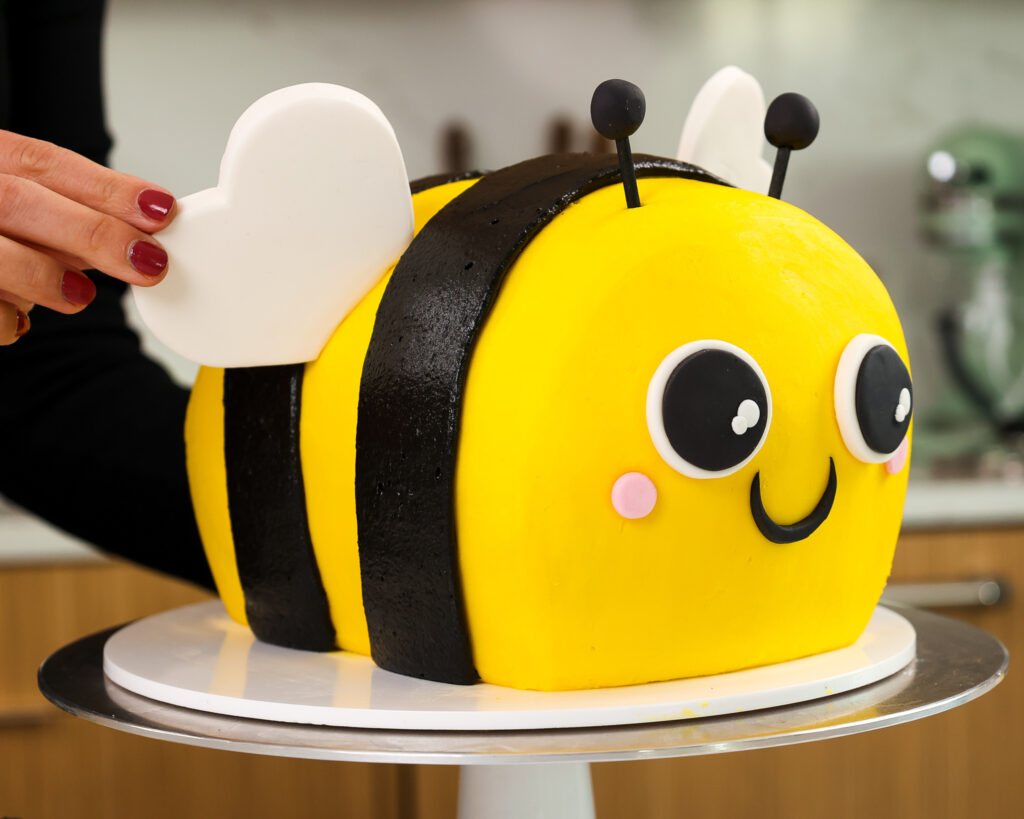
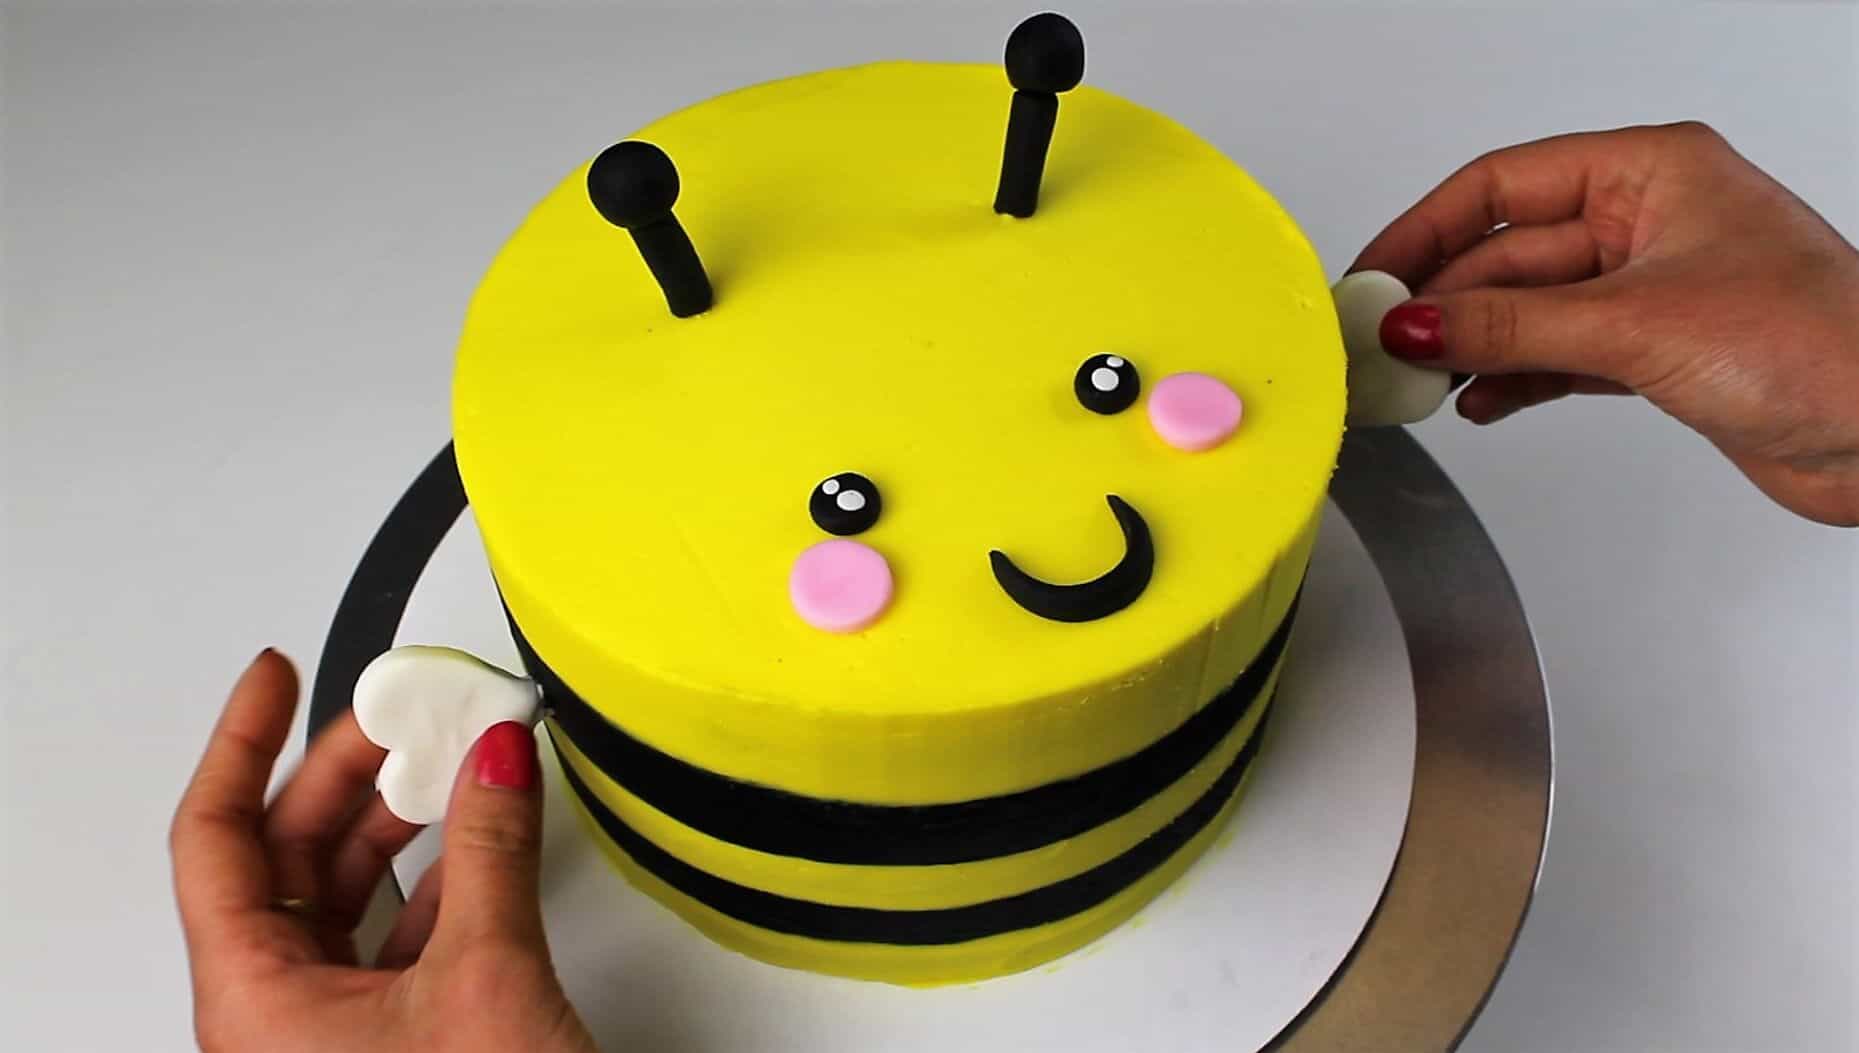
The final stride is to add on our bee's stripes, facial features, and wings!
Remove the cake from the freezer or fridge and pipe ii thick stripes around the cake with blackness buttercream.
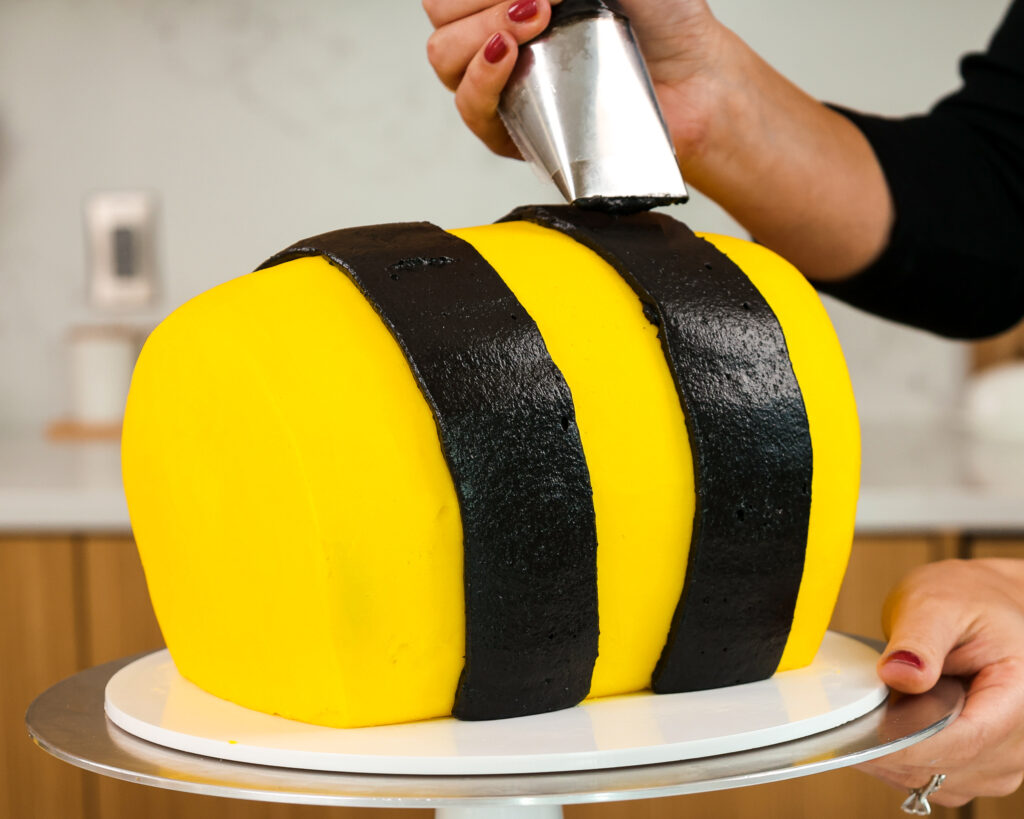
I recommend starting at the base of the cake and piping one-half of a stripe up to the top, then repeating this process on the other side. Information technology's way easier than trying to pipe each stripe in 1 motion!
Add together the fondant details and enjoy! If you're making this cake in accelerate, await to add the wings until right before you program to serve the cake.
Information technology will make information technology much easier to transport and air-condition the cake.
Bumblebee Block Substitutions and Swaps
Below are some swaps and substitutions that can be made in this cake recipe.
- Unsalted Butter – If you only have salted butter on manus, you can use it in identify of the unsalted butter in this recipe. Simply be sure to omit the salt that this recipe calls for. You can too employ vegan butter in its identify!
- Granulated Sugar – I do not recommend reducing the amount of carbohydrate or irresolute the blazon of sugar, as it will modify the texture of the block layers.
- Eggs– If y'all don't have eggs on paw or have an egg allergy you can use a flaxseed egg or an egg replacer.
- Blackness Cocoa – This recipe turns out best with black cocoa (I get mine on Amazon), but you can also utilize dark cocoa powder or regular unsweetened baking cocoa in this block recipe.
- Buttermilk – You can too apply full fatty yogurt, sour cream, whole milk, or an alternative yogurt or milk (almond, soy, oat) if you lot're dairy free.
- All Purpose Flour – This recipe turns out best with AP flour, but y'all can use a gluten gratuitous flour blend or cake flour if that'due south all you accept on mitt.
- Honey – I honey adding honey into the frosting in this recipe, simply it tin be omitted if needed.
- Heavy Cream – Whole milk or alternative milk (soy, almond, oat) will work fine in this frosting recipe if that'south what you have on hand.
Tips for Making the Best Bumblebee Cake
- Properly measure your flour(spoon into the cup measure, then level) or use a kitchen scale to mensurate your dry ingredients.
- Ingredients at room temp mix together better! Ready out any cold ingredients ahead of time.
- Mix your cake batter just until the ingredients are incorporated. This volition ensure your cake layers are tender and soft.
- Utilise a bench scraper and acetate sheet to help you get your last coat of frosting super shine.
- Chill your cake layers in the freezer for nearly 20 minutes before assembling the cake. This makes information technology easier to stack and frost.
- Make this bumble cake vegan or dairy costless if needed! Use your favorite type of dairy free milk to replace the buttermilk and heavy foam and utilize vegan butter sticks in place of the butter. For the eggs I recommend using an egg replacer like this.
- If yous want to make a larger version of this cake, double this cake recipe to make 4, 7-inch cake layers.
Making This Bumblebee Cake in Accelerate & Storage Tips
Brand your cake layers in accelerate and freeze them. It breaks the process up and makes it more approachable.
Make your frosting ahead of fourth dimension too or save whatsoever leftover frosting! It can be stored in an closed container in the fridge for up to a month, or in the freezer for up to three months. Exist certain to give it a skillful stir once it thaws to go the consistency nice and smooth again.
A frosted cake can last in the fridge for up to a week or in the freezer for up to a calendar month. The buttercream locks in all the moisture, keeping the cake fresh and delicious!
If you cut into the cake and take leftovers,use whatever remaining frosting to cover the cutting section to keep information technology moist and shop in the fridge for upward to a week.
Other Recipes You Might Like:
Permit Me Know What You Retrieve!
If y'all brand this bumblebee altogether cake, I'd love to hear what you lot think! Let me know past leaving a rating below.
If y'all programme to share on social media, you can tag me @chelsweets and #chelsweets and so that I tin can run into your astonishing creations on social media.
Prep Fourth dimension 30 minutes
Cook Fourth dimension 34 minutes
Additional Time xxx minutes
Total Time 1 hour 34 minutes
Instructions
Bumblebee Confront & Wings
- Make the bumblebee's wings and face first, so that they have time to dry! These tin can exist made several says in advance if needed and stored uncovered at room temperature.
- Scroll out the white fondant to exist about 1/iv inch thick to make the bumblebee's wings. Cutting out ii big hearts (about 4 inches in diameter). Trim off the base of the center and insert two skewers into each fly and fix aside. Every bit these dry, advisedly flip them over to make sure both sides have a run a risk to dry.
- Roll out the white fondant again to brand it thinner and utilise a circumvolve cutter or bottle cap to cut out two 1-inch circles to make the eyes. Acme these with ii black circles that are slightly smaller and brush a tiny bit of water betwixt them to aid them stick together. Add two small dots of white fondant to each center to give them a cartoonish look.
- Cut out a small arch from the black fondant to make the bumblebee'due south oral cavity.
- Side by side nosotros make the bumblebee's antenna. Coil out two small circles of black fondant that are most 1 cm broad and press each 1 onto a small skewer. Paint the skewer black employ a mixture of black gel food coloring and 1 tsp of articulate extract or booze.
- With the remaining blackness fondant, create a cone-similar shape to look like the bumblebee'due south stinger! Printing a toothpick or short skewer into it. Set aside.
Chocolate Cake Layers
- Begin by preheating the oven to 350 F / 175 C. Line four six-inch pans with parchment rounds and spray with non-stick baking spray.
- Add 1 cup of unsalted butter into the bowl of a stand mixer or a large basin and beat on a medium speed until smoothen and creamy. Add together two i/ii cups sugar and cream together on a loftier speed for 1-2 minutes with a whisk attachment or hand mixer. Scrape the sides of the bowl equally needed. The mixture should become calorie-free in color.
- Mix in 4 large eggs on a medium speed, 2 at a time.
- In a separate bowl combine 1 cup of hot h2o, 1 loving cup of buttermilk, and 1 loving cup of nighttime or black cocoa powder. Whisk until the mixture is smooth and no clumps remain.
- Sift three cups of flour, 1 one/ii tsp baking powder, 1 tsp baking soda, and 1 tsp salt into a large bowl.
- Adjacent, add 1/2 the dry ingredients into the butter/egg mixture. Scrape the sides of the bowl with a spatula to ensure the flour gets fully incorporated.
- Pour in the buttermilk/cocoa mixture and gently pulse the mixture to comprise the liquid. If you don't, you'll stop up splattering the cocoa mixture all over your kitchen!
- Add in the last half of the dry ingredients and mix on low until fully incorporated.
- Divide the batter evenly betwixt the prepared pans. I like to use a kitchen scale to make sure each pan has the same corporeality of batter.
- Bake for 31-34 minutes or until a toothpick comes out with a few moist crumbs.
- Let the layers cool in the pans for about 10 minutes, so run an offset spatula around the edge of the pans to help dissever the layers from the pans.
- Identify the pans in the freezer for about 45 minutes to accelerate the cooling procedure. In one case the layers are fully cooled, carefully flip the pans and remove the layers from the pans.
- Level two of the cake layers with a serrated pocketknife one time they're fully cooled.
- If you're making the cake layers in advance, wrap and freeze them similar this. Remove them from the freezer about fifteen minutes before you plan to assemble the cake. They will still be cold, and this volition make them easier to stack and minimize crumbing as you lot frost the cake.
Buttercream Frosting
- Trounce the unsalted butter on a medium speed for 30 seconds until polish with a paddle attachment and stand mixer or a hand mixer.
- Mix in the honey, vanilla extract, and salt on a low speed.
- Slowly add in the powdered sugar and mix on a low speed. I like to place a kitchen towel over my mixer to contain any powdered sugar clouds. Halfway through add in three Tbsp of heavy foam to make the frosting easier to mix.
- Mix on low until the ingredients are fully incorporated and the desired consistency is reached. If the frosting is likewise thick, add in additional cream (1 tsp at a time). If the frosting is too sparse, add in more than powdered carbohydrate (quarter of a cup at a fourth dimension).
- Place 1 cup of buttercream in a separate bowl and mix in the dark or black cocoa and black gel food coloring. I recommend adding in 1-2 additional Tablespoons of heavy cream at this stage, to make the frosting easier to piping. Mix until the frosting is evenly colored, then place in a pipage fit with a big flat piping tip.
- Color the remaining frosting xanthous with gel nutrient coloring. Add a small drop of orange gel nutrient coloring to give your frosting a warm, golden tone.
- Encompass the frosting with plastic wrap to prevent crusting and set aside.
Assembling This Bumblebee Cake
- Stack the cake layers on a greaseproof cardboard cake round or flat plate.
- Spread a small dab of buttercream on the eye of the board, to help your cake layer stay in identify. Brand the unleveled cake layers to be the bottom and top of the cake. This will requite the bee a rounder shape.
- Spread a thick layer of yellow buttercream on height of the block layer with a large showtime spatula. Echo with remaining cake layers.
- Chill the cake in the refrigerator (30 minutes) or freezer (ten minutes) until the frosting is firm to the touch.
- Once the frosting has prepare, employ a sharp knife to trim off 1-inch of cake from i side of the block. Flip the cake on its side and identify the cut portion of the cake confronting the cake board. I like to utilise a bench scraper to life the cake off the lath and flip it. If your cake layers first to carve up from each other one time the cake is flipped, insert a harbinger, chopstick, or dowel through the cake the help keep them together until the crumb glaze has fix.
- Encompass the cake in a thin layer of yellow buttercream and chill again.
- Then spread a thicker layer of yellow buttercream on the cake and smooth using a large offset spatula and acetate canvas. Arctic the block once more in the fridge (30 minutes) or freezer (10 minutes) until the frosting is business firm to the affect. This volition brand information technology much easier to add on the fondant facial features and wings.
Decorating This Bumblebee Cake
- Remove the cake from the freezer or fridge and pipage two thick stripes around the cake with black buttercream. I recommend starting at the base of the block and pipe half of a stripe up to the tiptop, then repeating this procedure on the other side. I find this is mode easier than trying to pipe each stripe in ane motion.
- Add the fondant details and bask! If y'all're having a difficult time getting the fondant $.25 to stick to the cake, use small dab of buttercream to press them into place.
- If you're making this block in accelerate, await to add the wings until correct before you plan to serve the cake! Information technology volition make information technology much easier to transport and refrigerate the block.
Notes
Tips for Making the Best Bumblebee Block
- Properly measure your flour(spoon into the cup measure, then level) or use a kitchen scale to measure out your dry out ingredients.
- Ingredients at room temp mix together better! Set out any cold ingredients ahead of time.
- Mix your cake batter merely until the ingredients are incorporated. This will ensure your block layers are tender and soft.
- Employ an acetate canvass to help you get your final coat of frosting super smoothen.
- Chill your block layers in the freezer for about xx minutes before assembling the cake. This makes information technology easier to stack and frost.
- Make this bumble cake vegan or dairy free if needed! Use your favorite type of dairy costless milk to supercede the buttermilk and heavy cream and employ vegan butter sticks in place of the butter. For the eggs I recommend using an egg replacer like this.
- If you want to brand a larger version of this cake, double this cake recipe to make 4, 7-inch cake layers.
Making This Bumblebee Cake in Accelerate & Storage Tips
- Make your cake layers in advance and freeze them. It breaks the process up and makes it more outgoing.
- Make your frosting ahead of time too or relieve any leftover frosting! It tin can exist stored in an closed container in the refrigerator for up to a month, or in the freezer for up to 3 months. Be sure to give information technology a skillful stir in one case it thaws to go the consistency nice and shine once more.
- A frosted cake can last in the refrigerator for up to a calendar week or in the freezer for upwards to a month. The buttercream locks in all the moisture, keeping the cake fresh and succulent!
- If you cut into the cake and accept leftovers,use whatsoever remaining frosting to cover the cutting section to continue it moist and shop in the fridge for upwardly to a calendar week.
Nutrition Data
Yield
20 Serving Size
1
Amount Per Serving Calories 448 Total Fat 21g Saturated Fat 10g Trans Fatty 0g Unsaturated Fat 10g Cholesterol 66mg Sodium 273mg Carbohydrates 64g Fiber 0g Sugar 54g Protein 2g

How To Make A Bee Cake,
Source: https://chelsweets.com/bert-the-bumblebee-cake/
Posted by: robertsonwithatim55.blogspot.com
0 Response to "How To Make A Bee Cake"
Post a Comment